2021. 11. 22. 18:33ㆍ강의 정리/노마드코더( ReactJS 강의 )
노마드 코더 Nomad Coders
코딩은 진짜를 만들어보는거야!. 실제 구현되어 있는 서비스를 한땀 한땀 따라 만들면서 코딩을 배우세요!
nomadcoders.co
오류를 해결하는데 도움이 된 사이트 :
Create React App
핵심 : 지금까지 우리는 import 형식을 통해서 리액트 어플리케이션을 만들었지만 이제부터는 create-react-app을 사용하여 ReactJS 어플리케이션을 만든다.
. create-react-app을 사용하여 어플리케이션을 만들면 개발 서버에 접근한다든가, 자동으로 새로고침을 시켜준다던가, 즉각적으로 어플리케이션 안에 CSS를 포함시켜준다든가 하는 기능들이 있다.
또한 쉽게 publish 할 수있다.
. 모든 과정을 따라 설치하면 아래 사진과 같은 파일들이 생김.
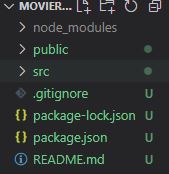
. src 폴더는 모든 파일들을 넣을 폴더이다.
폴더안에서 가장 중요한 파일은 index.js이고 index.js 안에서는 아래와 같이 우리가 자주 보던 것들이 존재한다.
import React from 'react';
import ReactDOM from 'react-dom';
import './index.css';
import App from './App';
import reportWebVitals from './reportWebVitals';

ReactDOM.render(
  <React.StrictMode>
    <App />
  </React.StrictMode>,
  document.getElementById('root')
);

// If you want to start measuring performance in your app, pass a function
// to log results (for example: reportWebVitals(console.log))
// or send to an analytics endpoint. Learn more: https://bit.ly/CRA-vitals
reportWebVitals();
. npm start를 통해서 서버를 킨다음
http://localhost:3000를 입력하면 나의 React 웹사이트를 볼 수 있다.
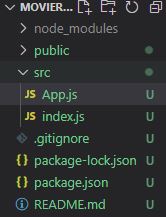
. src 폴더에서 App.js와 index.js를 빼고 다 지운다.
. index.js는 리액트 어플리케이션(App 컴포넌트)을 렌더링해주고, App.js는 App 컴포넌트를 만들어준다.
Tour of CRA(Create React App)
핵심 : 이전 react에서 배운 것들을 이용하여 create-react-app와 친해져본다.
아래 코드들을 통해 App.js와 button.js가 서로 어떻게 상호작용하고 렌더링되는지 알아보자
App.js
// button.js에 있는 Button 컴포넌트를 import한다.
import Button from "./button";
import PropTypes from "prop-types";
import styles from "./App.module.css";

function App() {
  return (
    <div>
      <h1 className={styles.title}>Welcome back to React!</h1>
      <Button text={"Continue"}/>
    </div>
  );
}

Button.propTypes = {
  text: PropTypes.string.isRequired,
}

export default App;
button.js
import styled from "./Button.module.css";

function Button({text}){
    return <button className={styled.btn}>{text}</button>;
}

// App.js에서 Button을 가져올 수 있도록 만든다.
export default Button;
import 없이 CSS를 이용하는 방법
. create-react-app으로 작업할 때의 포인트는 "분할하고", "정복하는" 것이다.
대표적으로 CSS module을 사용한다.
0. Button.module.css에서 btn 클래스를 만든다.
.btn {
    color: white;
    background-color: aquamarine;
}
1. Button.js에서 위 클래스를 적용시킨다.
import styled from "./Button.module.css";

function Button({text}){
    return <button className={styled.btn}>{text}</button>;
}
CSS도 module화 할 수 있다는 것이 엄청난 장점이다.
핵심 요약
1. React.js는 컴포넌트들이나 스타일들을 독립적이게 유지해준다.
2. create-react-app을 사용하여 어플리케이션을 만들면 개발 서버에 접근한다든가, 자동으로 새로고침을 시켜준다던가, 즉각적으로 어플리케이션 안에 CSS를 포함시켜준다든가 하는 기능들이 있다.
3. src 폴더는 모든 파일들을 넣을 폴더이다.
4. npm start를 통해서 서버를 킨다음
http://localhost:3000를 입력하면 나의 React 웹사이트를 볼 수 있다.
5. index.js는 리액트 어플리케이션(App 컴포넌트)을 렌더링해주고, App.js는 App 컴포넌트를 만들어준다.
6. create-react-app으로 작업할 때의 포인트는 "분할하고", "정복하는" 것이다.
7. CSS도 module화 할 수 있다는 것이 엄청난 장점이다.
'강의 정리 > 노마드코더( ReactJS 강의 )' 카테고리의 다른 글
| 동백 // 노마드 코더 React JS: To Do list (0) | 2021.11.24 |
|---|---|
| 동백 // 노마드 코더 React JS: EFFECTS (0) | 2021.11.23 |
| 동백 // 노마드 코더 React JS: Props (0) | 2021.11.22 |
| 동백 // 노마드 코더 React JS: STATE (0) | 2021.11.17 |
| 동백 // 노마드 코더 React JS: The Basic Of React (0) | 2021.11.15 |